Welcome

Thanks for dropping by to take a look at some of my thoughts and ideals. Hope you will let me know if this has been helpful, useful, inspiring or whatever, and remember to come back soon.

Sunday, September 30, 2012

Double Knit??

Boy isn't it a lovely day!  I can remember many years ago, now I'm going to tell my age here, when we first started seeing polyester double knit fabric.  Well we thought this was the best thing since zippers or maybe even the best thing since buttons.  You didn't have to iron it after it was washed and dried!  Oh my wasn't this a time saver and it gave us more time to do other things, like sew!  Everyone loved it!  Today the most amazing thing about this fabric is that it never wears out!!!  I mean never!  It is also very heavy! 
 
Well believe it or not I had a customer call me about quilting a top for her and I don't even remember where she said the top came from, but it was not something that she had made.  She wasn't even born I don't think, when they were making this stuff!  You guessed it the top was entirely double knit polyester! 
 
 
If you have never worked with this material, it is very stretch-------stretch-----------stretchie!  Extremely hard to quilt is the translation of that sentence!  But like Larry the Cable Guy, I "got 'er done".  I don't think Larry would have anything bad to say about the finished product either.  A lot of our older generation made quilts that were designed for a regular full size bed and the quilt was not the spread and they did not allow very much drop off of the sides of the mattress.  Many of the older quilts will just cover the top of the mattress with no drop down the sides at all!  This can make it difficult to use them as a regular part of the bed linen unless they are on a bed that is being slept in by one person only.  If more than one then you will hear the accussations of "cover hog" flying about frequently.  
 
At any rate I got this quilt and got it quilted.  Here it is!
You can tell in this picture that the person who made this handsewn quilt loved the 9 patch block because that is what it is!  All 9 patches sewn together without sashing or borders!

 Someone had a lot of scraps to get rid of and I don't know if they were all her's or not, but if they were all her scraps, she was a very prolific seamstress!

The person who brought me this quilt had picked out the backing and binding and I think she did a wonderful job.  All of the melon colors were just beautiful and the backing really brought out the color in the scraps.  As you can likely tell I just did a meandering quilting technique all over the top.  Sometimes that is just the best quilting pattern to keep it from looking too fussy or busy.

Now I love the binding and just wasn't able to get a good picture of it from the top.  Sorry I'm not better at photographing my projects.  The binding really made those colors pop out on the top!
 
 
I really enjoyed doing this very stretchy quilt!  It did turn out lovely.  I will give you a hint if you start to quilt a quilt top that has some stretchiness be sure to lay it out and quilt down the outside first!  This will help you manage all that in-between stuff and you can ease and stretch as you go to make things turn our properly!  They may never be perfect, but then neither am I.
 
Remember quilting is a very fun thing to do!  If it stresses you to the max then lets figure out why and see if we can turn this into something that is fun and relaxing.  I have found if something just really causes me to be anxious that I will do less and perhaps never even finish the project.  I need to stop and figure out why I am so very anxious and see if there is a way to de-stress it!!  Sometimes it's just one part that gives me trouble and if I can work through that the rest does fine.   Are you having a problem with a quilting project?  If the answer is yes, try to figure out which aspect is giving you the most problems and if you want my input just let me know.  I'm always happy to help a fellow quilter!
 
Ya'll have a great day.  Happy quilting.


Saturday, September 22, 2012

Little Quilts

Goodness, I wonder if I am the only person who is constantly saving my scraps of fabric with the ideal that I will use those things sometime and they pile just keeps growing and growing until it become unmanageable?  For some reason I don't think I am the only one.  Now I have had friends that have actually tried to put a label on my savings habit (of which I am very proud) and one told me one day that she had looked it up and I wasn't a tightwad I was just frugal!  Now I thought that was a huge laugh.  I'm not much into putting labels on everything anyway so it didn't bother me.  I know that I am planning to retire this year from the daily work force and be able to stay at home.  Were it not for the savings habit, I would not be able to do this (and I still question every day or two if this is the right thing or not) until I turn 65 at least and maybe even later than that! 

In addition to my piles (baskets actually and bags) of scraps I have a virtual mountain of books that I have been collecting for years and telling my husband that I was saving those for retirement so I would have plenty of patterns to make quilts by during retirement!  These books are stacked on my staircase.  East step holds between 5-10 books and magazines and assorted patterns that I have purchased when I saw something that I really liked all with the intention of saving for my retirement!
I guess it could also be said that I am a pack rat because of all these books and patterns!

Regardless, I found another book at the quilt shop yesterday.  I just love my local quilt shop and the people who work there.  Sew Bee It in Ringgold, Georgia is just a wonderful shop full of friendly people and I always have an enjoyable time when I go up for a visit, which I do often.  As you can well imagine we are on a first name basis there!

Back to my story.  I found a new book "Small Pieces, Spectacular Quilts" by Mary Elizabeth Kinch and Biz Storms.  I was drawn to the book by the cover picture which is a Pumpkin Peel Pattern.  The quilt is beautiful but I have to say I was not impressed with the directions.  This is definately a pattern for someone with experience.  In particular I don't like instructions that just say "cut wedges of varying widths".  I find this too general for directions except to experienced quilters.  I also wish they had included some indication of the quilting level required for each project.  I want people to have a successful outcome when they start to quilt and if they start a project that is very difficult and they do not have the experience needed they will get discouraged and I hate to see that happen to anyone.  I met a lady in Knoxville, Tn who wanted to learn how to quilt and the quilt she started on was a Baltimore Album.  The shop owner did try to tell her that her choice was not something that was normally recommended for a beginning quilter but she decided that she was going to try that one anyway!  I never did hear if she finished her quilt or not but fear it may have been too daunting a task for a beginner.  To be honest, I don't even feel up to trying a Baltimore Album but it is because I am not a fan of applique.  I am more of a person who likes to make progress quickly.

With all of that said you are likely wondering why I bought this book! Well, I have to try everything at least once it seems to see how it goes. One year I decided to do some paper pieced quilts for the ladies in the family. Sorry to say the pattern I choose was one that was very intricate and very time consuming and finally they were put away into the void of UFO's. Years later I pulled out the partially finished piece and squared up what was there and added borders and made myself a wall hanging. I will not tell you how much that wall hanging cost me, but it was more than I would normally spend for a full size quilt! Now after getting this book I'm starting another quilt with too many pieces. We'll see how it goes and if I finish a complete quilt or wind up with another wall hanging. In this one each 3" block has about 19 pieces. The squares are 1/2" finished and made into 4-patches and then the patches are put together with sashing between each one to make a 16 patch of 4 patches which are sashed together to form the large quilt. Boy that's a lot of work just trying to explain the pattern. I'll try to get a couple of pictures to show you how this thing goes together before I publish this post.

Not the best picture I have every made but this is one of the blocks!
This is one forth of the above square.
Of course this one is where I am putting the tiny four patches together to form the above block.
And this is the tinies with just the 2 squares together and in the top left corner is one I have put into a 4 patch.

  
(Okay I did good.  I got the pictures before publishing the post)  Wish I had more of it done, but as I said sometimes I am a little slow but I am still working on this.  I did mention to a friend of mine that maybe I should use the blocks I have put together to put on the back of some potholders that I'm planning on doing for Christmas and she cringed in horror and said, that is just too much work to put into a potholder!  She may be right.  So I'll continue to see how it goes!
 

Typically I will go on a writting binge and write several post and then put them up one at a time.  Which is where I am right now.  I do everything by binges, quilting, writing, cleaning!  Is anyone else like that?  At any rate since I am so very blessed with so many scraps, I'm trying my hand at this once again.  So thankful that I have had the opportunity to collect so many scraps and still have the health and resources to continue quilting.  Here's wishing you all a happy quilting week and I'll talk with you later! 

Saturday, September 15, 2012

Road Trip

Road Trip


Got up the other morning and it was just one of those days that I really didn't want to do anything much.  Not that my "To Do" list isn't huge, but I didn't want to do those things.  I'm sure you understand exactly what I'm talking about here.  I asked my husband, what do you want to do today?  His response, "I don't know."   Hummmmm.  After breakfast I sat down at the computer and opened up my facebook page and was looking at recent things and there it was!!!  Several weeks ago I had found on facebook a quilt shop called "Chattanooga Quilts".  I had said I wanted to visit that shop and just had not previously had the time.  Well guess what, now I have time.  I asked tubby hubby if he wanted to ride with me and he said okay.  That is not normal for him to be agreeable to visiting a quilt shop with me!  Must be kismit!
 
Like the wonderful planner that I am (not), I got the address and put it in the GPS and off we went.  Drove straight to the place without incident!  Between 40-50 miles from my house so a nice little drive.
 
This shop was a very nice small shop and the lady who was there was very friendly, but a good salesperson.  She did not hover,  she did offer help and even offered to get a chair for my husband to sit in while I shopped!  That impressed him and made him feel good too.  There was a class going on at the time I was there and the classroom was held behind a curtained off area of the shop.  There were lots of samples hanging on the walls with the books depicting the patterns located next to the samples and they were clearly labeled as to which book had that pattern which is always nice.  Makes it easy to find anything that is of interest.
 
I am sure it was designed for the shop owner, but the way the cutting table is set up next to the check out area was a good ideal and the area was L shaped with the long arm of the L holding the cutting table and the shorter base holding the check out area.  This configuration is nice because if you have several people waiting to have fabric cut and then more people waiting to check out they are not crowding each other.  I have been in shops where it is one long area and it was hard to tell who was waiting in which line. 
 
If you have some free time, this shop is worth a visit.  You may even decide to go back once you see the prices are reasonable and cheaper than some of the other stores I have visited.
 
Oh I do have to tell you that while I was there I bought another book.  I am forever buying books and this is another one that will help you use up your scraps.  This one is titled "Friendship Strips & Scraps" by Edyta Sitar for Laundry Basket Quilts.  Of course the sample on the wall is what prompted me to purchase this particular book.  The title of that quilt is Spool Quilt and I loved the strips used to depice the thread on the spools.  They had shades of blue which is one of my very fav colors in theirs.  The only thing is there is a lot of applique around the border of their quilt that I'm not too sure I will do!  Sorry I'm not really into applique unless it is by machine like a lot of  El's quilts.
 
At any rate this particular book has several different quilts using the fabric made of strips that are very intresting and something I may want to do after I retire.  (I keep saying that like I don't already have enough projects to keep me busy until I'm 100!)  Well at any rate this project is for a later date.  I've got too many on the back burner that need to be finished before I start another one!

If you have visited this shop already, please drop me a line and let me know what you thought.  Believe me I can handle it if your opinion and mine are not the same.  If you decide to go here in the future, let me know what you thought when you visit.  I love getting the opinion of others.  I often miss things on my first trip to a shop and it would be helpful to me! 
 
I hope you all have a wonderful day, quilting and sewing with love for your loved ones!  Now on to my next project!


Sunday, September 9, 2012

A beautiful first ever quilt top!

It's really hard to believe how quickly a week goes by!  I guess when you are busy everything just seems to fly!  Ah well, this is life as we live it....busy, busy, and more busy.  This week I do feel like I have made some progress and also I want to take a little time to let everyone in on a few items that you may not be aware of about the quilting process.

I have been able to finish up a couple of quilts this week, one of which is for the granddaughter of a very nice lady who belongs to the same quilt guild that I belong to.  This is a lovely quilt as I am sure everyone will agree.  The really amazing thing is that this is her very first quilt.  This is quite an accomplishment for her.  So many people will start a quilt top very enthusiastic about the quilt they are going to make and then find the process to be long and frequently they are not pleased with the results as they are progressing or it is something that just takes a lot of time to complete and they were not prepared for the time investment.  Many people want to start making a quilt without really planning out the whole top and then are disappointed in color or having trouble with the pattern because it is more advanced than they expected or life just shifts and they no longer have time so the top and the various pieces wind up stuck in a bag somewhere hoping someday to be finished when they have more time.  I can really talk about these things because I have been there!  Frequently these are places I have visited more than once!  Alas some people never return and eventually the work in progess is passed on to someone else or in some cases given to charity or just tossed in the trash!  I have actually inherited some of these from family members who have passed away.  Makes me wonder how many "Works In Progress (WIP's)"  I will leave for friends and family.  I said all of that to say this, the young lady did a great job!

 
Sorry for the poor quality of the picture, but it was a lovely quilt!  You may not be able to tell this from the picture but the solid black around the border is a wide rickrack.   The flowers and leaves and stems are appliqued onto the black and white background which is composed of many different fabrics, all black and white.  (This quilt has given me an ideal of what to do with my stash of black on white and white on black prints.)   I love the art form of the stylized leaves to go with the flowers.  I believe the name of this was "Rose of Sharon".  I do know that when she brought it to me for quilting she gave me a copy of the page from the book that contained the quilting recommendations and I did follow those recommendations.

The pattern suggested using a lot of feathers and flower mofits and a large meandering  so that is exactly what I followed.


It is very hard to see here but the pattern suggesed using a feather pattern in each of the flower petals and that turned out very well.  They did not make a suggestions for the center of the flower so I used a flower mofit in that area.

I also used the flower mofit in the leaves that are on the stems of the flowers.  These leaves were appliqued on using what appears to be one of the embrodery designes that come on most sewing machines.

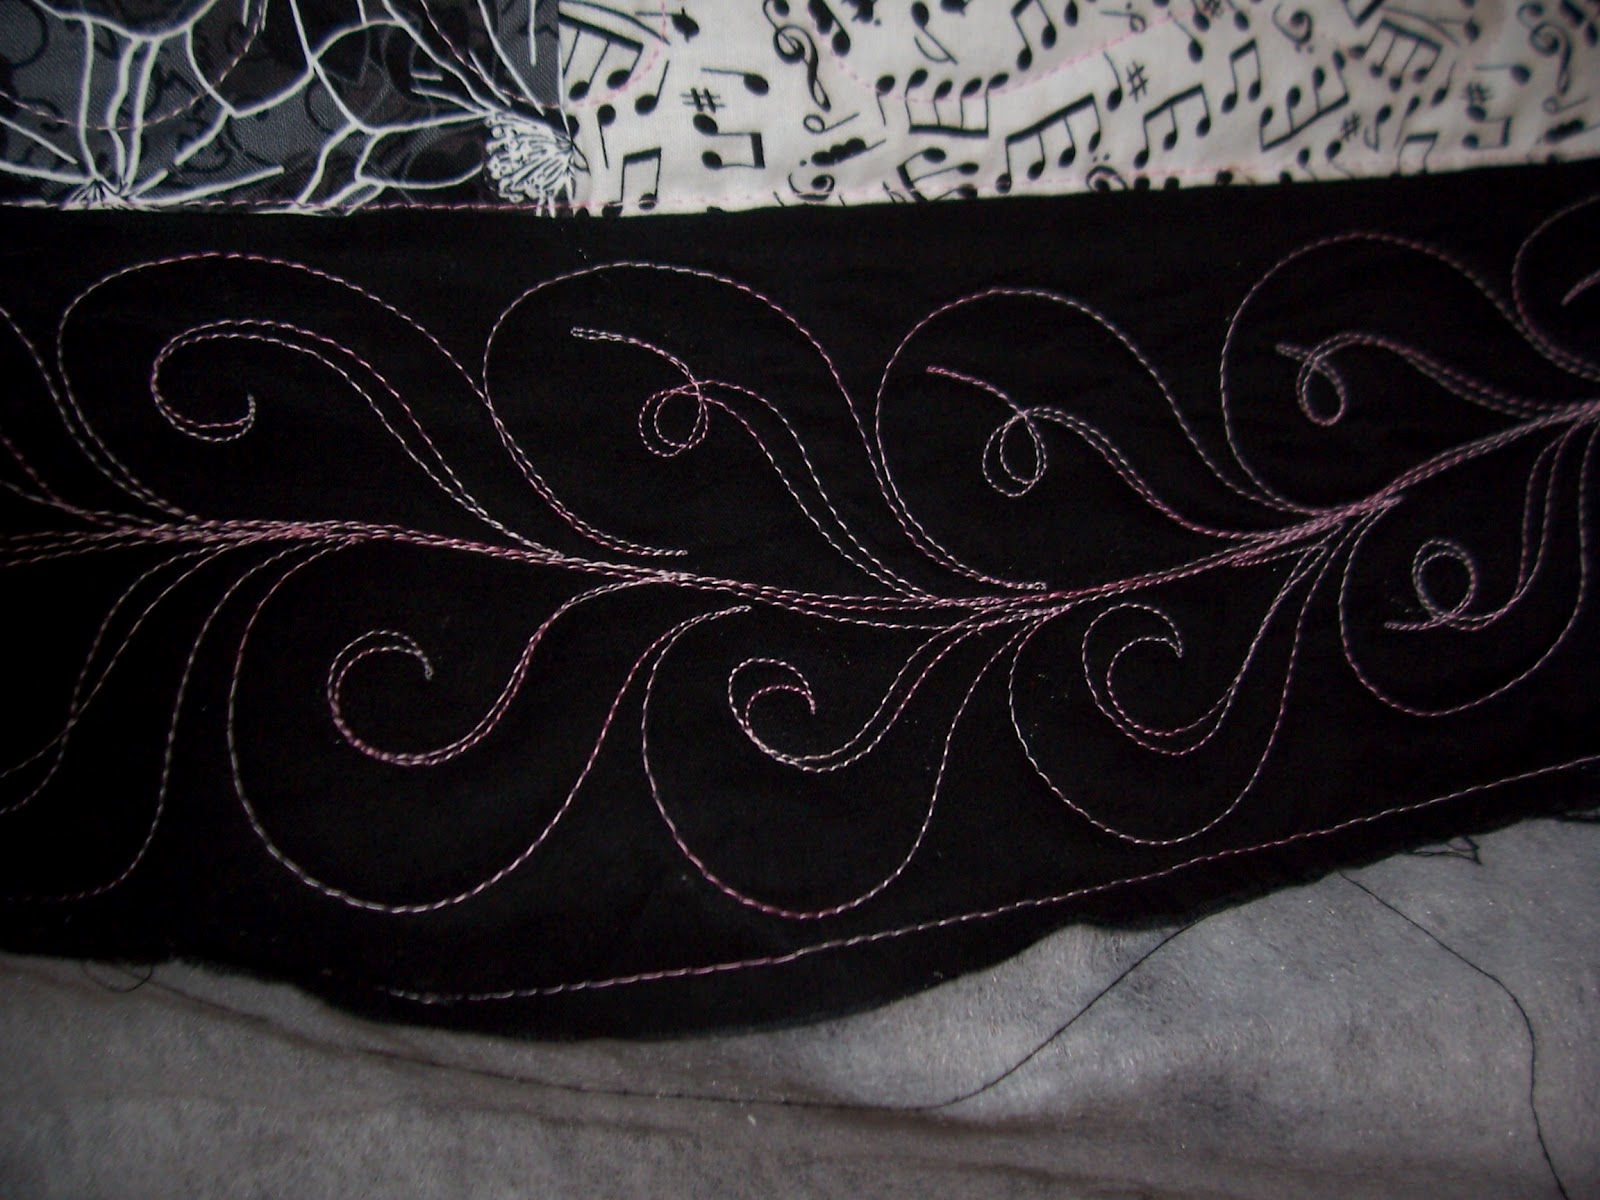
The recommendation did suggest a large feather in the outer border and showed a picture of the feather they were suggesting which I was able to replicate fairly accurately.  They suggested using pink verigated thread for the outer border.  I did use the pink verigated throughout the quilt and will write a little more about that later.

I really enjoyed doing the center Rose which was very large.  All of the stems went from the center Rose out and there were roses on all four sides of the quilt that overlapped into the outer border.  I used those flowers to divide the quilt so the outer border feathers were turned appropriately.  (There is a trick to that that machine quilters use.)

This quilt will be very successful.  I am hoping that once she has the binding in place she will take a picture and send it to me so I can see the finished product, perhaps displayed on the bed she has made this beautiful cover for!  I'm sure it will bring years of enjoyment to her and her family!

As a professional quilter I was very pleased that she was able to give me the recommendations for the quilting.  If you have never used a professional quilter it will be appreciated if you can do that for her/him and then they can tell you if they will be able to do that particular type of quilting.  This can really decrease disappointments when the quilt is finished.  If you make no recommendations that is fine, but then it is the quilters option as to what she puts on the quilt.  You may even want to just say something about what you do not want!  Like "I really don't particularly love the feathers that I see on many quilts, or I really don't want heavy quilting that makes the quilt feel stiff, or I want the quilt to be fluffy and soft.  Those are just a few of the things you can say to professional quilters that they will appreciate.  It is also nice if you have those things written down on a piece of paper to give the quilter so they can be attached to your quilt top for a reminder once she will be placing the top on the machine for quilting.

Another helpful thing to do for your professional quilter is to write your name and telephone number on a piece of paper and attach it to each piece that you are handing to the quilter.  While not all quilters are like me, I bet you would be surprised at how often pieces get seperated once they are in the sewing room, so make sure each piece has your name and telephone number.  Placing the pieces in one container helps.  I have one lady who brings her quilts to me, top, batting and backing all folded into a large pillowcase and each piece has her name on a piece of paper and pinned to the piece, including the pillow case!  Such a thoughtful lady!  You rock Pat!

You can also write on your information sheet that you attached to the top any other information such as, quilter to supply batting, please put binding on quilt but do not hand stitch binding in place.  Owner will hand stitch binding,  quilter to supply muslin backing (white or natural).  Please use light blue thread or I would prefer a thread that does not show up a lot so the piecing will be showcased.  I have quilted tops using clear thread so the piecing would be the main show, and I have used thread to make the quilting really pop out!

Quilting should enhance the top.  If there are large areas that need enhancement some special quilting in that area can be a really great thing!  Remember the choice is yours.  Your quilter wants to do something that will make you happy to show off your work and something you will enjoy for years to come!

Another couple of hints to make your quilter a happy person!

1.  If you want your quilt back at a certain time be sure to tell the quilter, write it on your instruction sheet attached to the quilt top and try to give the quilter a call at least a week or even 2 before you have to have the quilt back to just remind her that the date is coming up.  If there are any problems then she will have the opportunity to let you know.  Having your telephone number is really handy if there is a problem.  Sometimes at the best we all try to do we will not measure something correctly and perhaps the backing is not as large as it needs to be and if your telephone number is right there then she can call you to let you know as quickly as possible.

2.  It is wonderful if you will be sure to clip the dangling strings from the quilt top and backing if you have a pieced backing.  It is also really nice if you will trim any excess fabric hanging out on the borders.  For instance the top border when you sewed it to the quilt there was an extra inch or even 2 hanging out.  It is nice if you can just trim that off so the quilter does not have to deal with that and trying to get it squared when she is attempting to attach the top to her machine.

3.  Having things pressed is always a good ideal.  It doesn't have to be perfect, but please don't just wad the top or backing up and stuff it in a bag for the quilter to deal with when she starts taking the quilt out!  Things that are not pressed may be more prone to having pleats pressed into them and those pleats may be sewn in without it being realized.  A professional quilter will not give you back a quilt top with a big pleat in the backing that has been sewn down by the quilter.  She will take the quilt off of her machine and rip that stitching out and requilt the top without pleats in the back!  Any quilter who hands you a quilt and says there is a pleat in the back and I want you to look at it and see if it is okay, is not a professional!  Do not pay them for unacceptable practices!  They need to correct the problem.  You do not need to rip out their mistake and give it back to them to requilt.

4.  Ask your quilter how long it will be before you can expect to receive your quilt back.  If she is operating with a 6 month waiting period she should be able to tell you that.  Most professional quilters do have a waiting period.  They operate several different ways in how they handle those things.  Many will not put your quilt in line until they have your quilt and the supplies needed for the quilting on their shelf.  Some will make a list and add your name and number to the list and call you when they are close to ready to do your quilt.  Ask any quilter you are auditioning about the waiting period and how they handle that particular situation.

5.  It is extremely rare that 1 small (home sewing machine size) spool of thread will quilt a quilt.  Most quilters will have particular threads that run best on their particular machine.  Quilting machines do not use regular sewing thread and they do not use hand quilting thread.  Be sure and talk with your quilter about what thread she needs for quilting your quilt.  She may have thread on hand and there may be a charge for that thread so be sure and ask.  Also be sure to find out how many spools you will need to provide for the quilting you are requesting.  Also find out if you want more than once color of quiting thread if there is a charge for changing threads.  If you have decided that you want to use one color of thread on the front and another on the back talk with the quilter.  In large part this may not be a good ideal. Only your quilter can tell you if this is doable by her/him!

6.  Ask your quilter about deposits and payment.  She may prefer cash, she may or may not be able to utilize credit/debit cards.  Knowing these things in advance can help you have a successful relationship.

Heres wishing you all a happy week of sewing and quilting! 


Saturday, September 1, 2012

More T-Shirt Quilts


Photo: Wednesday morning humor...I've always wondered where the socks went!


Well I have been at the T-shirts again gals.  I just wanted to go through some of the process I go through for making these wonderful quilts that are so very full of memories, but first just wanted to share a little cartoon!  Some people will make quilts out of anything!

I am one of those people I guess.  I frequently repurpose items in my house to use them for other things.  This particular cartoon reminds me of a lady where I used to work.  She took their old socks that had the elastic stretched out of the top.  You know the kind that won't stay up.....  She would take the scissors and cut them from the top to the toe so they were flatter and then used them for dishrags.  They actually made very nice dishrags.  Now they didn't look great, but they sure did feel good because they were thick enough and soft enough to have a really nice feel when you were washing dishes in hot soapy water.  Of course today almost everyone has a dishwasher so they don't even know about the feel of a good dishrag.  Oh well, times change and we must go with the flow or be left behind!

I attempted to make a pictorial journal of the t-shirt quilt so I'm going to go ahead and post the pictures and put in the captions then I'll let you know at the end what I forgot to do!

The very first step of course is "harvesting" the portion of the tee shirt that you want to use.  Typically the logo.  Some shirts will have a logo on the front, some of the back, some on the sleeve and some will have them all 3 places and some will just have a small one on a front pocket!  When I start cutting the shirts I typically want to cut up the side seam and down the sleeve seam and you can do this on both sides to make the shirt lay flat on your cutting board.  I want to have some extra fabric along with the logo so I can "square up" the logo so I always make sure I have as wide an allowance as possible to allow me freedom in sizing and squaring.  If I can cut a 4" border around the logo that's okay.  Another thing I like to do is make sure that I cut all of the tee shirt pieces on even numbers.  The square I have cut may be 4" x 10" or 12" x 8".  They will not be 4 1/2" x 10 1/4".  They are doable like that, but it sure it a lot more headache trying to figure out the measurements!

Step 2 is to lay out the logos in the way you think you will use them on the quilt.  I typically do the layout on my bed and then will snap a few pictures after I am satisfied with the placement so I don't forget what I had in mind.

This picture is a little hard to see because I am standing to the side but this is how I lay out my harvested squares to get some ideal of how the final quilt will look.


Step 3 is measure and measure and measure!  How wide do you want the finished product?  Do you plan to put the pieces together in strips across the width of the quilt or top to bottom of the quilt?  If you are doing strips running from the top to the bottom then you want the logos you have cut out to be near the same width.  It is not likely they will be the same width exactly so you must plan to add a little fabric to some of the sides to get them all the same width but that addition is a few steps away.

Step 4 is apply the nonwoven interfacing to the back of the tee shirt material!  This will prevent stretching while you are trying to sew the fabric.  As you can see from this picture I try to use every speck of my interfacing and will line up the logos as accurately as possible.  On this piece which I cut next to the selvedge you can just see the selvedge above the logo.  This will be trimmed again for the final block!

 
Step 5 is once again squaring up the block.  I love using my Salem Rule for this that opens at a 45 degree angle making for perfect corners!


Step 6 is starting the process of making the quilt squares of a like size.  This particular shirt I added a strip up the right hand side fo the logo.  These strips will be of varying widths and when I am doing this I don't really want everything to line up exactly so I will swap around and the next shirt may have the strip on the opposite side.
 
Now as I said the next shirt has the strip on the opposite side and this strip had to be much larger for them to be the same width.


Now whether you are putting your strips together top to bottom or side to side you will need to know the finished size of the quilt you are wanting to make.  Once I have all the logos stripped up into the correct length or width (according to which way I am laying out the pattern), I need to add in the strips from one block to the next.  First I must add up all the lenght of each of the pieces in that strip.  Second I have to subtract that number from the length I want the quilt ( if I am making strips running from top to bottom).  So I have 5 logos in a strip.  1 is 16" 2 are 14" 1 is 10" and the other is 18".  This is length only and equals 72"  My finished quilt will be 96" and I want to use a finished 5" border around the outside, therefore my quilt needs to measure 86" finished and I have 72" unfinished so I need to add an extra 14" into the quilt in addition to the seam allowances. So my finished inner portion of the quilt will need to be 86 1/2" unfinished, so I will add this extra 1/2" to what I need.  14 1/2" and there will be a square, strip, square, strip, square, strip, square, strip, square.
 
5 squares and 4 strips and those 4 strips need to total 14 1/2".  So if I use 4" strips between 3 of the strips that will be 12" and then another strip at 2 1/2" that will give me my 14 1/2" in 4 strips.  That works!!!  Oh, lets add the seam allowances now to those strips so we don't mess up here.  Each seam will decrease the length by 1/2" if I am using 1/4" seams.  I will have seams at the top and bottom of each strip and there are 4 strips so I am talking about adding an extra 1" to the width of each strip.  The finished product will be a 5" finished border (cut 5 1/2" unfinished) a 15 1/2" finished square, a strip finished at 4" (cut at 4 1/2")  1 finished 13 1/2" finished square, a strip finished at 4", 2nd 13 1/2" finished square, a strip finished at 4",  a finished 9 1/2" square, a strip finished at 2 1/2" (cut at 3"), a finished 17 1/2" square and the bottom 5" finished border making a total of 94".
 
Use the same formula to figure you width measurements but for twin beds you will likely have on 3 strips of tee shirt lengths so you will have the 2 outer 5" finished borders and 2 strips inside the quilt making it border, tee-shirt strip, fabric strip, tee-shirt strip, fabric strip, tee-shirt strip and border.  For a regular size quilt you will perhaps have 4 tee-shirt length strips and 3 fabric strips plus borders and so forth for larger sized quilts.
 
The thing I failed to do was make a picture of the finished quilt before I delivered it and it now resides on the college bed of a student at Boston College!
 
This is actually the easiest way I have found of making the T-Shirt Quilts.  If you have a easier way I would certainly like to hear about it!  This was is easy enough for me that I can finish a top in about  7-9 hours depending on the size and then it is just quilting and binding.  What takes me the longest is actually the cutting the tee-shirts and getting the interfacing on them.  After that it is easy peesy! 
 
Best of luck to all of you who are going to try this.  If you run into any problems just let me know and maybe I'll be able to help you.  Happy quilting.